Option A: Dual Lock mounting the NavQPlus on the metal frame (Preferred)
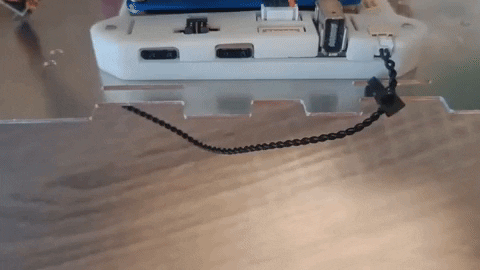
This is also a good time to mention that you should be extra careful with the small black patch antenna and the camera flex cable attached to the NavQPlus
Locate the DUAL LOCK type mounting tape eliminating the need for the procedure below and screw fastening. This will also elevate the NAVQPLUS boards slightly so that Ethernet and USB will have better clearance.
We recommend you just use some DUAL LOCK Velcro instead of screwing the NavQPlus to the metal frame.
Option B: Mounting the NavQPlus on the metal frame
Alternative mounting using screws
The kit includes DUAL LOCK type mounting, eliminating the need for the procedure below and screw fastening. This will also elevate the NAVQPLUS boards slightly so that Ethernet and USB will have better clearance.
We strongly recommend you just use some DUAL LOCK Velcro instead of screwing the NavQPlus to the metal frame.
An alternative method of mounting is to use the provided M3 screws to securely attach the board's corners to the following position in the metal frame:
Screw them in from the bottom side. It should look like this:
NavQPlus Cable management on top plate
Use a ziptie to secure the power cable (4 wire cable with 5 pin JST-GH), and route the CAN cables down and underneath as shown below.
Next: After successfully attaching the NavQPlus, the next step is to install the MR-CANHUBK344 evaluation board.
Step 2: Mounting the MPU/MCU boards to the top plate
We will now mount the NavQPlus and the MR-CANHUBK344 to the metal top plate. Follow the steps in the next two sections.
In the end, the top plate assembly should look like this:
Apply dual lock to bottom of the NavQPlus
Apply mating dual lock and stick to the top plate in the correct position shown here.
Zip tie the NavQPlus power cable
The right side is front end having camera and left side in the picture is the rear end.
Step 2c: Mounting LIDAR and Standoff for LIDAR arch stability
Ensure the metal top arch is oriented the correct way up and the Lidar is mounted facing the front.
A common mistake is for the top arch to be flipped upside down, resulting in the LIDAR facing the back. Check the direction of the LIDAR by looking at the images below and noting the embossed arrow on top.
Three M2.5 Cap Screws and Nylock nuts are included with the LIDAR
Use the included RC-CAR wrench to hold the nuts
Double check that the lidar is facing the front as shown here.
Standoff for LIDAR arch stability
There is a black (or orange) 3d printed plastic standoff post which also protect the cable.
This file will also be provided in
Do NOT attach the top plate to the B3RB, yet. This can only be done after completion of step 3: wiring.
The holes in the lidar standoff can be used to store some of the thumbscrews when not in use
Step 3: Attach front and rear plastic to top plate
Attach the NavQPlus camera to the front plastic mount.
The camera housing included with the NavQPlus mounts to the front "GoPro" style mount on the front plastic:
You must use the screw and bolt that included along with the original camera mount.
The camera flex cable should come out the back of the NavQPlus and loop over top of it. Then route under the lower edge of the front bracket. and up into the camera module.
The final setup should look like this:
Front and rear plastic
Screw the front and rear plastic to the top plate using two M3x5 screws from the bottom
The camera flex cable should already be attached to the front plastic.
Zip tie the lidar cable and standoff as shown in this picture. The wire should wrap around the back of the standoff.
The wires should wrap around to the back of the standoff and ziptie here as well.
Updated 3D printed LIDAR stand
Camera Flex cable routing over top of NavQPlus and under front bracket.
Ziptie the cables coming out of NavQPlus underneath the metal frame neatly as shown in picture
PDB Wiring of RGB LED
Introduction
The RGB LEDS communicate using a SPI-like communication which is modified in that it is unidirectional. The data and power for the LEDs is supplied by a STEMMAQT type connector the PDB, and the SCL SDA (SPI) lines have a second wire connector which attaches between the PDB and SPI port on MR-CANHUBK344
RGB LED wiring
The following image shows the LED lights setup with the left side representing the rear and the right side indicating the front of the car. This is pre-assembled.
If for some reason you need to re-create these connections, you should know that it is a daisy chain of STEMMA-QT type connectors, and that there is a marked IN and OUT connector on each of the LED light bars. The connections are from PDB -> IN(rear) -> out(rear) -> in (front)
Note that STEMMA-QT connectors are used but ABUSED and carry SPI signals not the normal STEMMA QT (I2C) signals.
Use the seven-pin JST-GH wire depicted in the picture below to connect from PDB to MR-CANHUBK344
Connect one end of the wire to SPI pin of the PDB.
Connect other end to the SPI2 of the plastic case of the MR-CANHUBK344:
Step 4: Wiring modules to each other
The MR-B3RB is versatile and can support several network wiring configurations. There are also several optional communication bus connections. This section will serve to show the BASELINE connections. We will also attach cables that may not be used, but should stay with the B3RB for future expansion or debugging.
Baseline B3RB wiring intent
Provide power to the NavQPlus and MR-CANHUBK344
Connect the NavQPlus and CANHUBK344 with T1 Two-wire Ethernet
Attach the LIDAR to the NavQPlus
Attach the SERVO and Motor Control PWM to the MR-CANHUBK344
Quadrature encoding from the motor/PDB to the MR-CANHUBK344
Connect the RGB LED lighting
Have debuggers and consoles attached
Optionally plug in unused RC-PWM input
Optionally connect CAN-FD cables, which could be used for peripherals and attachments
Optionally connect a serial console from the MR-CANHUBK344 to the NavQPlus
<<TODO - add link to section that removes the jumper on the PDB. Add PDB wiring section>>>
The final setup with al the established connections should look like this:
A closer view on MR-CANHUBK344 after wiring is completed:
And in the NavQPlus:
Please follow the steps 4a and 4b for the detailed explanation on these connections.
Pre-Assembled lower chassis showing the left side (rear of the car) and the right side (front of the car).
LED wire pin connection on PDB
The LIDAR is temporarily placed for visualizing the connection, not its final location.
A closer view on the connection on MR-CANHUBK344
Wiring QDEC cable
Introduction
The Quadrature decoder (QDEC) cable connects from PDB to MR-CANHUBK344.
Quadrature signals are coming from the encoder on the motor itself.
The PDB is then used to interface between the two different cable types.
QDEC signal provides measured information on how many revolutions the motor has made, and therefore how far the robot has travelled. This can then be used in the control system as an input.
See here for more information about Quadrature encoding.
Note Pre-production MR-B3RB used a special QDEC cable with orange band markings.
if you happen to have one or are upgrading a pre-production kit, do not use this cable as the signals are reversed.
QDEC (Quadrature Decoder) Cable
This cable is crucial for calculating the odometry, speed and direction of the robot car. There are six black wires and one red wire in it. The cable should look like this:
One end of the cable must be attached to the QDEC out pin on the PDB:
And the other end must be attached to the following pin on the MR-CANHUBK344:
Wiring T1 Ethernet cable
Introduction
The NavQPlus and MR-CANHUBK344 communicate to each other using 100Base-T1 Two wire ethernet .
BaseT1 Ethernet wiring between NavQPlus and MR-CANHUBK344
Connect the ethernet cable between the NavQPlus and the MR-CANHUBK344.
Zip Tie the cable at both ends and tuck it under the top plate.
Note the specific side notches to use.
Use a piece of tape to hold it neatly out of the way under the plate
Left side CANHUB and right side is NAVQPLUS
Steering Servo connection
Steering Servo PWM cable connection
This connection between the Steering servo and the PDB is pre-wired on the lower chassis but is shown here for reference.
Note that the PWM control signals are only passed through the PDB and XDHP connector and actually originate at the MR- CANHUBK344. +5V Power for the servo does get injected by the PDB though.
The image illustrates how a servo motor is connected to the PDB (Power Distribution Board). It shows three distinct wires: the red wire is +5V positive voltage supply, the brown wire is the ground connection, and the yellow wire carries the control RC-PWM signal from the microcontroller (MR-CANHUBK344).
As shown in the images, the correct orientation of the Servo wire is with the Yellow wire toward the short edge of the PDB. The Servo will NOT be damaged if this connection is reversed, it will simply fail to move.
Servo motor connection on PDB
Side showing PDB and Servo connection after removing side skirt
Wiring PWM / XDHP cable
Introduction
The MR-CANHUBK344 sends PWM signals to the Motor controller and also to the Servo. These are standard RC Model type PWM connections.
In order to facilitate keeping the signals in the correct order they are routed and consolidated onto a single cable and small "XDHP" connector board.
It is still quite important to get the XDHP connector positioned correctly on the PWM header of the MR-CANHUBK344
Technical note: The steering servo gets +5V power from the PDB
Thw PWM/XDHP wire connection should look like as depicted in the following picture:
PWM signals wiring to MR-CANHUBK344
The cable carrying PWM signals between the MR-CANHUBK344 board, and the Power Distribution Board should look like as shown in picture below. It is a seven wire interface which carries multiple PWM signals and has a VCC line and a ground.
There is a small "XDHP" adapter board to fit on the PWM pin-header of the MR-CANHUBK344 board. This is provided in the kit and show in the image above
Please be extra careful that the XDHP adapter board is connected and aligned correctly.
Damage to the board could result from incorrect connection.
XDHP connection on PDB side
The one end of the PWM cable is connected on the XHDP pins on the PDB:
The other end of the cables having the xHDP adapter on it is mounted on the first three columns(Three pairs of three pins) of PWM pins which represents PWM0, PWM1 and PWM2 positions of the MR-CANHUBK344 respectively:
XDHP (PWM) connection on MR-CANHUBK344 side
Installation of the XDHP adapter board and cable is most easily done when the cable and connector are conected together first. Then gently bend the wires at a 90 degree angle. Push the XDHP adapter onto the CANHUBK344 pin headers.
The images show XHDP adapter is mounted on the first three columns (Three pairs of three pins) of PWM pins.
This corresponds to PWM0, PWM1 and PWM2 positions of the MR-CANHUBK344 respectively.
The XDHP aligned toward the PWM header CLOSEST to the side of the board with the CAN connectors.
Connection PDB XHDP connector to MR-CANHUBK344
XDHP Cable and small adapter board
XDHP Adapter board
Connection from CANHUB to PDB using black PWM cable
Wiring Power cables
Introduction
There are two 5 pin JST-GH cables that provide battery power to the MR-CANHUBK344 and the NavQPlus. They are 5 pins, with no wire in the center position. Two wires are battery voltage+ and two wires are battery voltage-. Be sure to limit the voltage applied at the battery to <20V or the specified ratings for any boards plugged in.
The nominal battery voltage is expected to be ~12V,
Long and short power cable
There is one long and one short power cable included in the kit.
Connect is the LONG power cable from the MR-CANHUBK344 to one of the the Power Distribution Board Pout connectors.
The shorter length power cable can be similarly connected to the NavQPlus
When done, ZIP TIE the cables to the edge of the top plate and make them neat.
Wiring Power to NavQPlus
Power Cable
Power cable from PDB to NavQPlus
It is a four-wire cable having two red and two black cables representing VCC and ground respectively. Firstly, connect one end of the cable to any of the pout terminal on the PDB.
Then connect the other end on the following connector of the NAVQPlus.
The cable shown below is NOT USED with the B3RB and PDB.
It may be attached already when you first open the NavQPlus.
Keep it safe as it may be useful for other configurations or when bench testing NavQPlus with an 3S LiPo battery or bench power supply.
BaseT1 Ethernet wiring between NavQPlus and MR-CANHUBK344
This is also explained here:
Lidar connection
<TODO> refer to the mounting of the LIDAR base
The cable necessary for connect the NavQPus to the LIDAR-STL-27 is the number one in .
A closer view of this cable:
The Lidar used is the following:
You should connect the smaller end of the cable to the Lidar and the bigger end to the UART3 Serial port of the NavQPlus:
Thse are all the connections available for NavQPlus:
This is one of the last steps. You may still want to check everything over to avoid having to insert and remove screws
Preparation
In previous steps you should have
A Note about screws
There are several options for the screws to hold on the arch:
Form your own threads by hand (carefully)
The Lidar arch attaches with screws into the plastic front and rear covers. Ideally M3x5 Socket head cap screws are used, but the plastic is not threaded making it diffocult to insert the screws.
With care an patience you can cut your own threads by pushing consistently while turning the screw, then backing off and cleaning the debris off the screw threads. Repeat this several times until the screw goes in all the way.
Use a Thread Tap
Alternatively if you have access to an that will very quickly and easily form threads.
Use the self tapping screws from the Buggy spare screw kit.
These are small self tapping black screws from the Buggy spare parts kit. While somewhat small, they will work to hold the arch in place.
When completed your Lidar arch should look something like this:
The GPS module is primarily used to provide the Magnetometer, sound and SAFETY button for the system. Not all systems will use the GPS localization functionality. The software however is capable of using the use of GPS position data for navigation outdoors.
An ARMING board is also included in the kit and can be used with alternative software.
This can provide the safety button and sound functionality, but not the Magnetometer needed for robotics navigation using Cognipilot.
M10 GPS connection
You need to add first the M10 GPS mount to the metal frame. This is explained in the section
The M10 GPS cable attaches to the MR-CANHUBK344 as shown below
This will be a checklist review of all the connections for the base B3RB
Connection: SPI wire for LED
SPI input port (used for LED Lighting) on PDB
SPI2 port (output to LED Lighting) on CANHUB
Connection: 100BaseT1 Ethernet
Connection: QDEC
Connection: PWM Cables
Connection: PDB power to NAVQPlus
Connection: PDB power to CANHUB
Additional information about the boards and wiring
(DRAFT)
Block Diagram of the NavQPlus
<todo> insert a block diagram and or photo of wiring. Image below may be helpful
<todo > add schematic block diagram of how everything is connected
100Base-T1 two wire automotive etherenet connection
QDEC Out connector on PDB
QDEC to LPUART9/10 connector on CANHUBk344
XHDP Port (RC-PWM inputs) on PDB
RC-PWM output pin header
with XDHP adapter attached
on MR-CANHUBK344 T1
Pout connector on PDB
Pout on NAVQPLUS
POUT on PDB
POUT on CANHUB
Assembled and wired B3RB without Cover
Top cover as a stand
Bonus feature!
The top cover doubles as a work stand.
This will keep the wheels up of the ground and can be quite useful while testing.
You should add soft tape or foam on the underside of the buggy chassis in order to avoid scratches on the top cover.
Block Diagram
Block Diagram showing board and sensor connections
Block Diagram: Power Distribution Board
The PDB (Power Distribution board) is where both power enters from the battrey , and also provides a number of connector "translations" to match the motor and LED lighting. Specialized connectors on the motor and encoder to translate to the Dupont-style or standard DroneCode connector pinouts.
It should be noted that the block diagram above does not show ALL the power distribution connections, which are as follows:
Battery input through a fuse
Battery voltage and current measurement through the INA226
3x Battery voltage outputs on 5 pin JST-GH for NavQPlus, MR-CANHUBK344, Extra
5V regulating supply for LED lights, and powering PWM servo rail on MR-CANHUBK344 and therefore the Servo itself.
PWM signals are consolidated into a single XHDP connector for ease of connection.
Block Diagram: GPS Module
The GPS combines UART, I2C for Compass, and GPIO for switches, LED, and Beeper into a single large DroneCode standard connector.
Block Diagram: Debugging interfaces
The DCD-LZ interface simply combines SWD and a UART on a single JST-GH Dronecode connector.
Depending on your kit you may have any of the following debug adapter boards:
FTDI USB-UART cable and adapter for UART/Console on the NavQPlus
FTDI USB-UART cable + DCD-LZ adapter for MR-CANHUBK344 DCD-LZ interface
In some systems you will find NeuralProbe board with USBC interface and connectors for UART/Console AND DCD-LZ interface. This board includes a USB-UART converter and also includes a button that will toggle the RST pin on SWD/JTAG interface. There is a 3rd interface on this board for Pixhawk V6X debug+uart connectors (not used here, used with NXP MR-VMU-RT1176)
X-MR-B3RB-PDB Schematics
Schematics as per production build.
The PDB serves two main functions:
1) Takes in Battery voltage and provides FUSED RAW battery and regulated 5V power out.
2) a connector interface converter board.
Additional features include:
An INA226 power simple power measurement IC is used to give an indication of battery state by Current and voltage measurement.
The Raw Battery connectors go to other boards such as NavQPlus and MR-CANHUBK344
The 5V power supplies the servo and other local interfaces
Other connectors are provided to adapt between the B3RB motor's Hall sensor, Quatrature encoder and drive signals.
LED lighting via a STEMMAQT type connector also is adapted . NOTE This is NOT STEMMAQT signalling specification. But it is convenient to use the available off the shelf cabling.
MR-B3RB History
MR-B3RB is a kit of kits
History
MR-B3RB is short for Mobile Robotics - Buggy3 Revision B. This is the second revision to a robotic vehicle called .
Some people didn't like calling a product "buggy". So even though Buggy3 is a brave name, we decided to instead make it MR-B3RB as it is a nice and friendly robot like R2D2.
We took lessons learned from that platform and applied them as an upgrade for 2024.
Uses the same rugged metal base RC car, with readily available replacement and upgrade parts
No need to change the steering servo
Upgraded BLDC motor with gear reduction, integrated ESC (motor controller) and quadrature encoder output that can be used for vehicle odometry
Metal upper chassis that can be removed as a module
Power distribution board with additional connector matching and power supply for boards and servos.
Removeable mounting plate for companion computer, real time processors, communications radios and any other add on components
RGB addressable lighting
Optional upgrade to plastic sides, front, rear and lidar arch mount
Optional GPS / remote Magnetometer/ arming button
Currently this is the PRE-Production version, there will still be some updates coming to improve the modularity of the top plate, and provide additional mounting for user added 3d printed components.
The following pages describe the mechanical assembly of the MR-B3RB-M.
Pre-assembled Lower Chassis
Note that the lower chassis of the latest version of MR-B3RB-M should be partially assembled as follows:
Front and rear "bumper" plastic
PDB (power distribution board) installed
LED lighting installed and wired to PDB
These instructions are now updated for the production version of the MR-B3RB. If you have a pre-production version, please see or the previous version of the document.
QDEC (Quadrature Decoder) cable to motor installed
Motor cable connected to PDB
XT60 battery wire and power switch attached to PDB
the archive area here
Step 1: Preparing lower chassis
The MR-B3RB should look like this unit after opening the box.
MR-B3RB
The lower chassis comes partially assembled with:
the side skirts attached
the side plastic attached
the PDB partially wired
and the LED lighting installed and wired.
Lower chassis out of the box.
Remove top plate screws and side skirt screws
Remove screws that hold on the side plates and also the screws that hold on the top plate.
The screws holding the side skirts and top plate on top will be replaced with the larger thumbscrews.
KEEP these M3x5mm screws for attaching the MR-CANHUBK344 to the top plate later
Use a hex screwdriver or Allen Key and remove all top screws securing the top plate to the metal frame and carefully set them aside.
This is also a good time to double check that the black side skirts are installed flush and correctly, like in the picture above.
View with top plate removed
Remove the side skirt screws.
Step 0: Pre-checks for the lower chassis
Check and Adjust motor gear meshing
The gears are adjusted at the factory and should usually not need to be touched on a new B3RB. However over time it may be that they need adjustment. Follow this procedure to re-adjust the gear meshing.
Diagnose any Motor Gear Meshing Issue
1. Gently rotate the wheels using your hand while holding the B3RB in the air
2. Listen Carefully: Listen to the sound of the gears as you rotate the wheels. Ideally, the gears should mesh smoothly without any grinding or excessive noise.
3. Feel for Resistance: As you rotate the wheels, feel for any resistance, unevenness or skipping of gears. This could indicate that the gears are not meshing properly.
Adjust the Gear Mesh
If you feel the gears are not meshing well, you will may adjust them as follows.
1. Locate the Motor Mounting Bracket: Identify the motor mounting bracket where the motor is attached to the chassis or frame of your device.
2. Loosen the Adjustment Screws: Typically, there are two screws at the front of the motor mounting bracket that secure the motor in place. Use an appropriate screwdriver to gently loosen these screws. You don’t need to remove them completely, just enough to allow slight movement of the motor.
3. Adjust the Motor Position: Apply mild pressure to the motor in the direction that will improve the gear meshing. This usually means pushing the motor closer to the gear or slightly adjusting its angle to ensure the teeth of the gears are aligned properly.
4. Check and Tighten: After adjusting, rotate the wheels again and listen for any improvement in the gear meshing. Once satisfied with the adjustment, carefully tighten the screws back into place to secure the motor in its adjusted position.
Check XT60 extension swivel mount
The XT60 battery connector is installed at the factory, ensure that it pivots freely as shown in the video below.
Step 2b: Mounting MR-CANHUBK344
Introduction
MR-CANHUBK344 is the real time controller board for the robot. After successfully attaching the NavQPlus, the next step is to install the MR-CANHUBK344 evaluation board.
Step 8: B3RB battery
Introduction
Typical battery and battery connection
Install the MR-CANHUBK3-ADAP on the MR-CANHUBK344
Included in the kit is a CANHUB ADAP board. This board has IMU (Inertial measurement Unit) components on it such as Accelerometer, Gyro, Magnetometer, as well as specific connectors for GPS and other interfaces.
Attach it to the CANHUBK344 as shown below.
Assemble MR-CANHUBK344 onto top plate
The MR-CANHUBK344 board should be attached in the highlighted holes of the following image.
Reuse the M3x5mm screws that were previously removed from the side skirts.
These M3x5mm screws should be used to screw in from the bottom side.
Be cautious to not squeeze or pinch any of the existing wires attached to the NavQPlus!
Upon completion, the entire assembly should appear as follows:
There are two locations where on board batteries could be located after being connected
Battery on Mezzanine level
1) On the "mezzanine" level of the frame and
Battery on Mezzanine level
Battery on Lower level of Frame
2) On the lower part of the the lower chassis.
Slide battery in end first
Battery on lower frame level (preferred)
Since the mezzanine level may be used for additional electronics in the future, we will refer only to the removeable battery location on he lower chassis.
Notes on Securing the battery
The exact method of securing the battery is dependent on the user preferences.
There is a battery strap included in the kit. This could also be used to strap to the upper/mezzanine level of the metal frame.
You may wish to remove the small plastic battery tray frame that is already installed in the kit in order to free up additional space.
A foam piece can be used to wedge between the underside of the battery and the lower chassis in order to prevent any movement. This wedges the battery "up" against the underside of the mezzanine level.
3D printed pieces may be designed also to hold the battery in a preferred way.
Battery Power switch
Latest versions of MR-B3RB-M include a power switch mounted under the front edge of the B3RB. Toggle it to the on or off position as desired.
Step 2d: Mounting M10 GPS Module and metal frame
Introduction
The kit may include either or both an ARMING board and/or a GPS module.
The GPS module in addition to being used for GPS, the it does also include a arming/safety switch, LED lights and a beeper. Generally if you have a GPS, it is preferred to use that rather than the ARMING board.
PX4 Arming Board vs GPS
NOT all kits include the GPS module. Notably the NXP-CUP car kit will not. Instead use the BOARD and stick it down in a convenient location.
The arming board will provide the same beeper and arming buttons. However it does not include a compass component.
Install M10 GPS module
If provided in your kit, please install the GPS and GPS post mounting,
The the pieces are listed in the page.
Important notes:
1) Install the base plate with the clamping screw pointing either forward-right or forward-left. This will allow you to loosen/tighten even when the plastic rear piece is installed.
2) install the GPS so that the arrow is pointing forward on the B3RB
3) Zip tie the cable so that it stays tight against the carbon fiber mounting tube. This is to minimize interference with the LIDAR beam
4) Don't tighten down the mast clamping screws, you will need to remove the GPS top or the GPS and the MAST in future steps. Tighten them only enough so the parts can still wiggle and be removed.
GPS parts
GPS Base installation
There is a set of screws that comes with the GPS unit.
Use the 4 longer screws and Nylock Lock Nuts to attach the base mount.
It should be placed in this furthest back position:
GPS Mast installation
Attach the mounting mast rod and fasten it with one of the smaller two screws left.
At this time only tighten the screws loosely as you will need to rotate align and remove the mast before completion.
Attach the top mount with the remaining screw.
Keep it also only loosely tightened.
It should look like this when completed:
Attach the M10 GPS module to the mast
Locate the M10 GPS and the 3M double tape.
Attach the double tape in the center of the top mount.
Align GPS facing forward
Carefully align the GPS in the center of this tape. Ensure the arrow on the GPS module is facing forward. The cable of the GPS should be zip tied so it stays very close to the GPS mast in order to not obstruct the LIDAR sensor.
Trim any long cable ties with side cutters.
Wiring Power to MR-CANHUBK344
Power cable from PDB to MR-CANHUBK344
Extra-long power cable for MR-CANHUB to PDB connection.
These cables connect to any of the 4 pin Pout connectors on the PDB. All Pout connectors are the same, but some may be closer and provide a better location. Choose one that makes your wiring tidy without overstretching the cable.
And the other end connects to the power input (AKA VBat) of the MR-CANHUBK344
Orient the lower clamp so that it can be accessed from the side. As shown here.
Zip tie the GPS cable so that it is tight to the mast.
The GPS and cable will fit in the slot of the back plastic
MR-CANHUBK344 Power input
MR-CANHUBK344 Power input
Step 8a: B3RB battery specification
LiPo Battery Specification
Typically we use off-the-shelf LiPo battery pack similar to what is used in RC airplanes and Quadcopters.
The battery should have the following specifications:
LiPo 3s (Three Cell) 12V nominal voltage (10-14V)
2000-3000mAh
XT60 connector with balance leads
Dimensions
A) 75mm L x 34mm W x 26 H (short and stubby)
B) 100-110mm L x 35mm W x 22-26mm H (longer format)
Other dimensions are possible. Ensure the battery chosen fits the compartment area,
A battery is NOT included with the kit. This can be purchased online or from a local hobby shop
Links to sample batteries
Below are links to some example batteries. THIS IS IN NO WAY an endorsement of these specific batteries, only a link so you can see more detail about the types of similar batteries that could be used:
You will find that "Stubby/Shorty" batteries such as listed below will give you more working space. However longer thinner batteries have also worked well
Example Stubby / Shorty type battery pack
Zeee 3S 2200mAh Lipo Battery 11.1V 50C Shorty Pack Battery with XT60 Plug for RC Car Truck RC Vehicles Boat Drone RC Airplane Quadcopter Helicopter FPV Racing Hobby Models(2 Pack)
You must use a LiPo battery charger to safely charge the battery. There are very inexpensive ones available that will charge using the cell termination connectors at the expense of them being quite slow to charge. Many other types of chargers exist. When choosing a charger consider that this is a safety issue and overcharging or improperly charging can be dangerous and result in a fire.
There are many excellent LiPo battery chargers available. ISDT makes several high-end charges like the following: (This is an example, and not a specific recommendation)
Battery monitor usage
MR-B3RB units have a power monitor built into the PDB board. This will tell you the total pack voltage and individual cell voltage. It will alarm when the cell voltage goes too low.
There is an optional BMS that can interface with the B3RB. It provides advanced battery monitoring capabilities.
Battery Alarm
LiPo batteries shoudl never be over-discharged. The PDB battery monitor will measure the battery voltage level, and properly running software and control software will alert the user if tbe battery is low.
As an extra backup, a small battery alarm board is included, that can be attached to the battery CT leads directly. This is recommended and can save you from over discharging during development or when you may get distracted (i.e. at a tradeshow or seminar)
The alarm is connected as shown in the attached photo.
While it's usage is mostly self explanatory, you can learn more via YouTube tutorials such as this one:
Step 5: Attach upper chassis
(optional) Tie wrap wires
After connecting all the cables, proceed to attach the metal board frame to the robot car using the screws you removed at the beginning of this tutorial:
Front Plastic Shield with Mount for Camera
Please attach the plastic shield with the camera housing to the robot's front using M2.5 pan head Philips Self-Tapping screws, which are located in this box provided:.
For reference, a picture of the screws is displayed here:
<<<TODO - these are not the correct screws. They should be flat head (tapered head> screws. Take picture and add here>>>
The mounting must look like these pictures:
Back Plastic Shield
And the attach the back plastic shield of the robot with the same screws:
The antenna depicted in the image must be handled with utmost caution and preserved within the protective plastic enclosure.
CAN Termination network
CAN Networks typically requre proper termination at both ends of the bus in order to function correctly.
Many of the boards used will include this termination optionally on board.
Additionally many of the NXP boards use CANSIC (Signal Improvement Can Phy) which is more resiliant to mis-matched or incorrect termination.
Included in the kit is also a CAN termination board. By plugging in the can termination to the second connector on the MR-CANHUBK344 or NAvQPlus it will add termination network to that end of the circuit. This board also includes a USB input and solder pads for instances where power is to be supplied into the CAN bus using this device. In the MR-B3RB this power injection is NOT needed as 5V power is already supplied.
Note by default there are NO can devices running on the MR-B3RB. You may experiment with MR-BMS771, RDDRONE-BMS772, UCANS32K1SIC, CAN GPS modules, CAN motor controllers etc. Or Experiment with a CAN Bus connection between the MR-CANHUBK344 and NavQPlus. Software suppoert in Linux and Zephyr RTOS is already present.
Step 8b: B3RB battery charger
LiPo Battery charger
You must use a LiPo battery charger to safely charge the battery. There are very inexpensive ones available that will charge using the cell termination connectors at the expense of them being quite slow to charge. Many other types of chargers exist. When choosing a charger consider that this is a safety issue and overcharging or improperly charging can be dangerous and result in a fire.
There are many excellent LiPo battery chargers available. ISDT makes several high-end charges like the following:
(This is ONLY an example, and not a specific recommendation)
Battery monitor usage
MR-B3RB units have a power monitor built into the PDB board. This will tell you the total pack voltage and individual cell voltage. It will alarm when the cell voltage goes too low.
There is an optional BMS that can interface with the B3RB. It provides advanced battery monitoring capabilities.
Battery Alarm
LiPo batteries shoudl never be over-discharged. The PDB battery monitor will measure the battery voltage level, and properly running software and control software will alert the user if tbe battery is low.
As an extra backup, a small battery alarm board is included, that can be attached to the battery CT leads directly. This is recommended and can save you from over discharging during development or when you may get distracted (i.e. at a tradeshow or seminar)
The alarm is connected as shown in the attached photo.
While it's usage is mostly self explanatory, you can learn more via YouTube tutorials such as this one:
MR-B3RB units have a power monitor built into the PDB board. This will tell you the total pack voltage and individual cell voltage. It will alarm when the cell voltage goes too low.
Advanced BMS
There is an optional BMS that can interface with the B3RB. It provides advanced battery monitoring capabilities.
Battery Alarm
An external battery alarm is included in the Kit
LiPo batteries should never be over-discharged. The PDB battery monitor will measure the battery voltage level, and properly running software and control software will alert the user if tbe battery is low.
As an extra backup, a small battery alarm board is included, that can be attached to the battery CT leads directly. This is recommended and can save you from over discharging during development or when you may get distracted (i.e. at a tradeshow or seminar)
The alarm is connected as shown in the attached photo.
While it's usage is mostly self explanatory, you can learn more via YouTube tutorials such as this one: